14 KiB
Distance Field (Surface) Shader
The Distance Field (Surface) surface shader is similar to the Distance Field shader, but rather than simulating local directional lighting, it interacts with Scene lighting. It is not a physically based shader.
This shader uses Unity's surface shader framework, which makes it quite flexible, but also more demanding on the GPU.
Properties
 Face: Controls the appearance of the text face.
 Outline: Controls the appearance of the text outline.
 Bevel: Adds a second rendering of the text underneath the original rendering, for example to add a drop shadow.
 SurfaceLighting: Controls the appearance of locally simulated lighting on the text.
 Bump Map: Adds bumpiness to the text face and/or outline using a normal map texture.
 Environment Map: Adds a reflection effect to the text face and/or outline using a normal map texture
 Glow: Adds a smooth outline to the text in order to simulate glow.
 Debug Settings: Exposes internal shader properties that are sometimes useful for troubleshooting.
Face
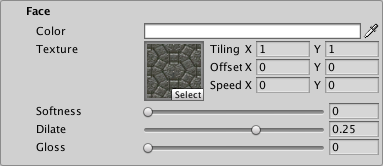
You edit Distance Field Surface shader properties in the TextMesh Pro object Inspector. Properties are divided into several sections, some of which you must enable in order to activate the property group.
| Property: | Description | |
|---|---|---|
| Color | Adjust the face color of the text. The value you set here is multiplied with the vertex Colors you set in the TextMeshPro component. Set this to white to use the original vertex colors. Set this to black to cancel out the vertex colors. Similarly, setting the Alpha to 1 uses the original vertex-color alpha, while setting it to 0 removes any alpha set in the original vertex colors. |
|
| Texture | Apply a texture to the text face. The texture is multiplied with the face Color and the vertex colors in the TextMesh Pro component to produce the final face color. The Horizontal Mapping and Vertical Mapping properties in the TextMesh Pro component determine how TextMesh Pro fits the texture to the text face. |
|
| Tiling | Increase these values to repeat the texture across the text surface, in accordance with the TextMesh Pro object's Horizontal Mapping and Vertical Mapping properties. | |
| Offset | Adjust these values to change the texture's relative position, horizontally or vertically, on the text surface. | |
| Speed | Animate the face texture by setting a value greater than 0. The resulting animation is a scrolling effect as the texture’s UV coordinates change over time. Note: To see this effect in the Scene view, you must enable Animated Materials from the Effects menu in the Scene view control bar. |
|
| Softness | Adjust the softness of the text edges. A value of 0 produces crisp, anti-aliased edges. Values greater than 0 produce increasingly soft/blurry edges. This setting applies to both the text face and the outline. |
|
| Dilate | Adjust the position of the text contour in the font distance field. A value of 0 places the contour halfway, which corresponds to the contour of the original font. Negative values thin the characters, while positive values thicken them. |
|
| Gloss | Adjust the glossiness of the text face. Glossiness determines the appearance of specular highlights when light hits the text. Higher values produce smaller specular highlights. |
Outline
Description
| Property: | Description |
|---|---|
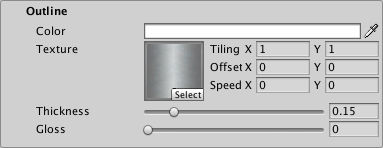
| Color | Adjust the color for the text outline. Tthe outline is not visible unless you set a Thickness value greater than 0. |
| Texture | Apply a texture to the text outline. The texture is multiplied with the outline Color to produce the final outline color. The Horizontal Mapping and Vertical Mapping properties in the TextMesh Pro component determine how TextMesh Pro fits the texture to the text outline. |
| Tiling | |
| Offset | |
| Speed | Animate the outline texture by setting a value greater than 0. The resulting animation is a scrolling effect as the texture’s UV coordinates change over time. Note: To see this effect in the Scene view, you must enable Animated Materials from the Effects menu in the Scene view control bar. |
| Thickness | Adjust the thickness of the outline. The higher the value, the thicker the line. The outline is drawn on the text contour, with half its thickness inside the contour and half of it outside the contour. You can pull it farther in or push it farther out by adjusting the Face > Dilate property. |
| Gloss | Adjust the glossiness of the text outline. Glossiness determines the appearance of specular highlights when light hits the text. Higher values produce smaller specualr highlights. |
Bevel
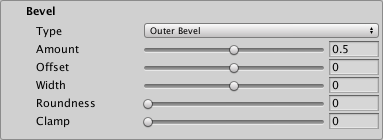
A bevel adds the illusion of depth to your text. It works like a normal map, except that the shader calculates the bevel sing the font’s signed distance field.
Bevels are prone to showing artifacts, especially when they are too pronounced. These artifacts are more or less obvious, depending on the material you use. Sometimes, artifacts that are more obvious on a simple material are hardly noticeable on a more complex material.
Although bevels work best with text that has an outline, you can apply them to text without an outline as well.
| Property: | Description | |
|---|---|---|
| Type | Choose the type of bevel to apply | |
| Outer Bevel | Produces raised lettering with sloped sides. The bevel starts at the outside of the outline and increases in height until it reaches the inside of the outline. |
|
| Inner Bevel | Produces text with a raised outline. The bevel starts at the outside of the outline, increases in height until it reaches the middle of the outline, and decreases in height until it reaches the inside of the outline. |
|
| Amount | Adjust the steepness of the bevel. This setting defines the apparent difference in height between low and high regions of the bevel. |
|
| Offset | Offset the bevel from its usual position so it no longer matches the outline. Different offsets produce very different bevels. This is especially useful when you apply a bevel to text with no outline. |
|
| Width | Adjust the bevel size. Set a value of 0 to make the bevel fill the full thickness of the outline. Set a positive value to make the bevel extend beyond both sides of the outline. Set a negative value to shrink the bevel toward the middle of the outline. If you are setting a bevel for text with no outline, you must set a positive Width. You should also set a negative Offset to ensure that the whole bevel is visible. |
|
| Roundness | Increase this value to smooth out more angular regions of the bevel. The effect is often quite subtle. | |
| Clamp | Set this value to limit the maximum height of the bevel. Higher values mean the bevel reaches its maximum height sooner. Clamped outer bevels end before reaching the inside edge of the outline. Clamped inner bevels have a larger flat region in the middle of the outline. |
Surface Lighting
These settings control simulated local directional lighting. They work in combination with the Bevel, Bump Map, and Environment Map settings.
| Property: | Description |
|---|---|
| Specular Color | Set the tint for specular highlights. These are the highlights you see when the text directly reflects the simulated local light source. |
Bump Map
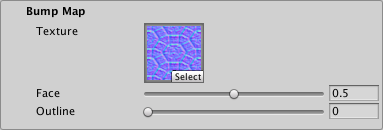
You can use a normal map as a bump map to add bumpiness to the text. The bump map affects both the text face and outline, but you can control how strongly it affects each one individually. If your text has both a bevel and a bump map, the two mix together.
| Property: | Description |
|---|---|
| Texture | Select a normal map texture to use as a bump map. |
| Face | Control how much the bump map affects the text face. A value of 0 shows no effect while a value of 1 shows the full effect of the bump map. |
| Outline | Control how much the bump map affects the text outline. A value of 0 shows nothing while a value of 1 shows the full effect of the bump map. |
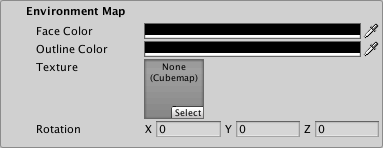
Environment Map
An environment map can be used to add a reflection effect to your text face or outline. You can either use it for reflections of a static Scene or for special image effects. The mobile shaders do not support this.The environment texture is a cubemap. You can either provide a static cubemap or create one at run time via a script.
| Property: | Description |
|---|---|
| Face Color | Choose a color to use to tint reflections on the text face. This color is multiplied with the environment map before the reflectivity effect is applied to the text face. When this color is set to black, the environment map has no effect on the text face. When this color is set to white, the environment map is at full strength on the text face. |
| Outline Color | Choose a color to use to tint reflections on the text outline. This color is multiplied with the environment map before the reflectivity effect is applied to the text outline. When this color is set to black, the environment map has no effect on the text outline. When this color is set to white, the environment map is at full strength on the text outline. |
| Texture | Choose a cubemap texture to use as an environment map. |
| Rotation | Rotate the environment map to control which parts of the texture are visible in the reflection. You can animate the rotation to create a sense of movement. |
Glow
The Glow effect adds a smooth outline on top of other text effects, which is typically used to suggest a glow. The effect is additive, so it is more noticeable on dark backgrounds.
When the glow extends beyond the text boundary, the surface shader shades it as if it were part of the solid text, meaning that it gets simulated lighting effects such as specular highlights.
| Property: | Description |
|---|---|
| Color | Set the tint and strength of the glow effect by adjusting the Color and Alpha values respectively. |
| Offset | Adjust the center of the glow effect. A value of 0 places the center of the glow effect right on the text contour. Positive values move the center out from the contour. Negative values move it in toward the center of the text. |
| Inner | Control how far the glow effect extends inward from the its start point (text contour + Offset). |
| Outer | Control how far the glow effect extends outward from the text contour (text contour + Offset). |
| Power | Control how the glow effect falls off from its center to its edges. A value of 1 produces a strong, bright glow effect with a sharp linear falloff. Lower values produce a glow effect with a quick drop in intensity followed by a more gradual falloff. |
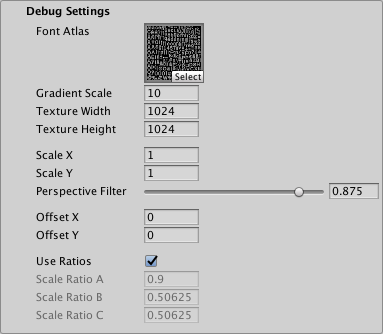
Debug Settings
The debug section exposes some of the shader’s internal properties. They can be helpful for troubleshooting problems you encounter with the shader.
| Property: | Description | |
|---|---|---|
| Font Atlas | Points to the atlas texture used by the font Asset. | |
| Gradient Scale | Represents the spread / range of the font’s signed distance field. This determines the effective range of material properties such as Outline > Width and Underlay > Offset X/Y. This value is equal to Padding +1, with Padding being the Padding value set when the font Asset was created. Note: This value is displayed for debugging purposes. You should not edit it manually. |
|
| Texture Width/Texture Height | Displays the texture atlas width and height specified in the Atlas Resolution settings when the font Asset was created. | |
| Scale X/Scale X | Set multipliers for the SDF scale. When set to 0, characters are rendered as blocks. Negative values soften the characters, while positive values make them appear sharper. |
|
| Perspective Filter | When using a perspective camera, adjust this setting to make text look softer when viewed at sharp angles. The default setting of 0.875 is adequate in most cases. When using orthographic cameras, set this to 0. |
|
| Offset X/Offset Y | Offset the vertex positions of each character in X and Y. You can change these values using a script to create simulated crawl or scrolling FX. |

